
Things To Do
How to Validate a Contactless Bus Ticket in Rome (Ultimate 2026 Guide)


Ah, Rome. The Eternal City. A place where you can eat your weight in carbonara, marvel at two-thousand-year-old architecture, and… completely panic when you step onto a crowded ATAC bus and don’t know how to pay for your ride. If you’re visiting Italy in 2026, you’ve probably heard that the city has modernized its public transport with a slick contactless payment system called “Tap&Go.” But how exactly do you validate a contactless bus ticket in Rome? And more importantly, how do you prove you paid when the notoriously strict ticket inspectors board the bus?
As a seasoned traveler and your dedicated BlueFire Travel SEO Expert, I’ve ridden the infamous 64 bus to the Vatican more times than I can count. I’ve seen tourists get slapped with hefty €50 to €100 fines simply because they didn’t understand the rules of the contactless game.
In this comprehensive 2026 guide, we are breaking down everything you need to know about navigating Rome’s buses using your credit card, smartphone, or smartwatch.
Key Takeaways: Rome Contactless Tickets
| Feature | Details for 2026 |
| Payment System | Tap&Go (Contactless Credit/Debit, Apple Pay, Google Pay) |
| How to Validate | Tap your card/device on the red/black reader until it beeps and flashes green. |
| Cost & Duration | €1.50 (or current 2026 rate), valid for 100 minutes of unlimited bus/tram transfers and one metro ride. |
| Inspector Checks | Present the exact same card/device used to tap. Inspectors scan it with a handheld device to verify. |
| Crucial Rule | One card per person. You cannot tap the same card twice for two different people. |
| Backup Plan | Always carry a paper BIT ticket or use apps like MooneyGo in case the contactless reader is broken. |
The Magic of Tap&Go: Rome’s Contactless Revolution in 2026
Rome hasn’t always been the most tech-forward city when it comes to public transport. For decades, travelers had to hunt down a Tabaccheria (tobacco shop) or a working machine to buy a paper ticket, only to realize everything was closed on a Sunday. Enter the “Tap&Go” revolution, which has fully matured and integrated by 2026.
What is Tap&Go?
Tap&Go is ATAC’s (Rome’s public transport company) contactless payment system. It was initially introduced on the Metro turnstiles but has now been successfully rolled out across the entire urban network of buses and trams. It allows you to pay for your fare directly on board without needing a pre-purchased paper ticket.
Accepted Payment Methods
You don’t need a special Rome transit card. You can use:
- Contactless Credit Cards: Visa, Mastercard, American Express.
- Contactless Debit Cards: V-Pay, Maestro.
- Smartphones: Apple Pay, Google Pay, Samsung Pay.
- Smartwatches: Apple Watch, Garmin Pay, etc.
Traveler Tip: To ensure your digital wallet works flawlessly, make sure your phone has active data. Snagging the Best eSIM for Europe before your trip is a game-changer. An eSIM keeps you connected so your Apple Pay pings the server instantly, and you won’t get caught offline while trying to figure out Google Maps in a dead zone near the Colosseum.
Step-by-Step: How to Validate Your Contactless Bus Ticket in Rome
Validating a paper ticket in Italy involves shoving it into a yellow machine and waiting for a loud ka-chunk sound. Contactless is different, and the sheer lack of a physical receipt trips a lot of people up. Here is the exact process:
Step 1: Board the Bus and Find the Reader
Roman buses have multiple doors. Traditionally, you enter through the front or back doors and exit through the middle (though on a packed bus, it’s a free-for-all). When you hop on, look for the Tap&Go reader. It is usually a red or black circular terminal mounted on a pole near the front of the bus (and sometimes at the back, separate from the yellow paper-ticket validators).
Step 2: The Tap and the Beep
Hold your card or smart device flat against the screen of the reader. Wait a second or two. You are looking for two things:
- A distinct “beep” sound.
- A green light or a green checkmark on the screen.
Once you get the green light, your ticket is validated. Do not wait for a paper receipt; the machine does not print them.
Step 3: Understanding the 100-Minute Rule
Your contactless tap charges you for a standard BIT (Biglietto Integrato a Tempo) ticket. This gives you 100 minutes of unlimited travel on buses and trams, plus one entrance into the Metro system.
What if I switch buses? If you get off bus 85 and hop onto bus 64 within that 100-minute window, you must tap your card again on the new bus. Don’t worry—the system is smart. It recognizes your card and will not charge you a second time, but it registers your presence on the new vehicle, which keeps you compliant with ATAC rules.
The Dreaded Ticket Inspectors: How Do They Check Contactless Cards?
This is the number one question tourists have: “If I don’t have a piece of paper, how do I prove to the inspector that I paid?”
Ticket inspectors in Rome operate in packs. They will abruptly board the bus, block the doors so no one can escape, and yell “Biglietti, per favore!” (Tickets, please!).
What Happens During an Inspection?
When the inspector approaches you, simply hand them the exact same physical credit card you used, or pull up the exact same digital card on your smartphone/smartwatch.
The inspector carries a small handheld digital reader. They will tap your card or device against their reader. Their device connects to the ATAC server and verifies that a payment was initiated within the last 100 minutes.
Privacy Note: The inspector’s device does not see your bank balance, name, or full credit card number. It uses a secure, anonymized token to verify the transit transaction only.
The “One Card Per Person” Rule (Crucial Warning!)
I cannot emphasize this enough: You cannot pay for multiple people with the same contactless card.
If you are traveling as a couple, you cannot tap your Visa, hand it to your partner, and have them tap it again. The system will only register one active ticket per card. If an inspector catches you, one of you will be treated as a fare evader and slapped with a €50+ fine.
Every single person needs their own physical card, or you need to use different digital wallets (e.g., you use your physical Visa, your partner uses Apple Pay linked to a different card).
Essential Travel Hacks for Europe in 2026
As a savvy traveler, your logistics go beyond just the bus. Here are the things you absolutely need to sort out for a seamless European vacation.
Protect Your Trip: Why Travel Insurance is Non-Negotiable
Rome is incredibly safe, but pickpockets on crowded buses (looking at you, Termini routes) are a known nuisance. Plus, unexpected trip cancellations or medical emergencies can bankrupt a vacation. Securing comprehensive Travel Insurance is the smartest investment you can make. Ensure your policy covers theft, lost luggage, and health emergencies so you can ride the Metro with total peace of mind.
Navigating Beyond Rome: Car Rental Deals and Luxury Hotels
If your 2026 itinerary includes exploring the rolling hills of Tuscany or the Amalfi Coast after your Roman holiday, you’ll want to look into the best Car Rental Deals early. While you absolutely should not drive in Rome’s city center (the ZTL zones will fine you into oblivion), renting a car on your way out of the city is perfect for day trips. And after a long day of driving, treat yourself by booking one of Italy’s exquisite Luxury Hotels—many of which offer private parking and a desperately needed Aperol Spritz upon arrival!
The New Reality: ETIAS Visa Requirements
By 2026, the European Travel Information and Authorisation System is in full effect. If you are visiting from the US, UK, Canada, Australia, or other historically visa-exempt countries, you must apply for an ETIAS authorization before your flight. Do not confuse this with a traditional visa; it’s a quick online waiver. However, failing to meet the ETIAS Visa Requirements will result in you being denied boarding at your home airport. Don’t let a tiny administrative fee ruin your trip!
Troubleshooting: What If the Machine is Broken?
Welcome to Italy, where sometimes things just… don’t work. It is entirely possible that you board a bus and the Tap&Go reader is out of order (Fuori Servizio), or there are so many people packed onto the bus that you physically cannot reach the machine.
Do not assume you can ride for free. If an inspector boards, “the machine was broken” or “the bus was crowded” is not a valid excuse, and you will be fined.
Always Have a Backup Plan
- Paper Tickets (BIT): I always recommend keeping one or two €1.50 paper tickets deep in your wallet. Buy them at a Metro station or Tabaccheria when you arrive in Rome. If the contactless machine is dead, run to the back of the bus and punch your paper ticket in the yellow machine.
- Digital Apps: Download apps like TicketAppy or MooneyGo. You can buy tickets on your phone via these apps using PayPal or a credit card. If you see the tap reader is broken, simply open the app and manually activate one of your pre-purchased digital tickets right there on the bus.
2026 Trends: Sustainable Travel & Digital Nomads in Italy
Rome is heavily investing in sustainable travel. You’ll notice a massive influx of quiet, electric buses roaming the historic center in 2026, making the air noticeably cleaner around the Pantheon and Trevi Fountain. Furthermore, with Italy’s Digital Nomad Visa fully operational, the city is packed with remote workers. These expats rely heavily on the weekly and monthly ATAC passes, but for the average tourist, solo traveler, or budget-conscious backpacker, the Tap&Go system remains the undisputed king of convenience.
Conclusion: Master the Roman Commute
Navigating Rome’s public transport doesn’t have to be intimidating. By understanding how to validate your contactless bus ticket, keeping a backup paper ticket handy, and ensuring everyone in your group has their own payment method, you’ll travel like an absolute local. Master the buses, avoid the fines, and you’ll have more money and time to focus on the important things—like debating whether gelato is an acceptable breakfast food (spoiler: it absolutely is).
Would you like me to help you map out a Rome itinerary that connects all the major sights via the easiest bus routes?
Frequently Asked Questions (FAQs)
Q: Do I need internet access to use Tap&Go on the bus?
A: If you are using a physical contactless credit/debit card, no internet is required. If you are using Apple Pay or Google Pay, your device generally creates a token without active internet, but having a connection ensures the transaction syncs perfectly. (Again, grabbing the best eSIM for Europe is highly recommended!).
Q: What if the ticket inspector’s machine charges me twice?
A: It won’t! The inspector’s device is configured strictly for verification, not for processing new payments. It will only read the digital token to confirm you tapped the ATAC reader within the valid 100-minute window.
Q: Can I use Tap&Go to get to Fiumicino or Ciampino Airport?
A: No. The standard Tap&Go fare is for the urban network only. It does not cover the Leonardo Express train or the regional Cotral buses to Fiumicino (FCO) or Ciampino (CIA) airports. You will need a separate, specific ticket for airport transfers.
Q: Is it safe to tap my credit card on a crowded bus?
A: Yes, the ATAC machines are secure and encrypted. However, be mindful of your surroundings. Crowded buses are prime territory for pickpockets. Keep your card securely in a front pocket or zipped bag immediately after tapping.
Q: I tapped my card but didn’t hear a beep. What do I do?
A: Look at the screen. If it shows a red “X” or error message, the payment failed. Try a different card or use a backup paper ticket/app. Do not sit down until you see the green validation light, or you risk an expensive fine!
When you shop for flights online, you’ll often see the term “OTA.” This guide explains what it means, how it works behind the scenes, and whether you should use one for your next trip.
What Does OTA Mean?
OTA stands for Online Travel Agency (some people say Online Travel Agent). It’s a website or app that lets you search for and book flights without going straight to the airline.
Think of an OTA as a digital travel agent. Instead of checking ten different airline websites, you go to one site. That site shows you flights from many airlines side by side. You pick the one you like and book it right there.
Well-known OTAs include Expedia, Booking.com, Priceline, Trip.com, and CheapOair.
[Image suggestion: after this section, add an illustration of a traveler on a laptop with one browser window showing logos of several airlines and a single “Book Flight” button — showing how an OTA lets you compare many airlines in one place.]
How Does an OTA Work When You Book a Flight?
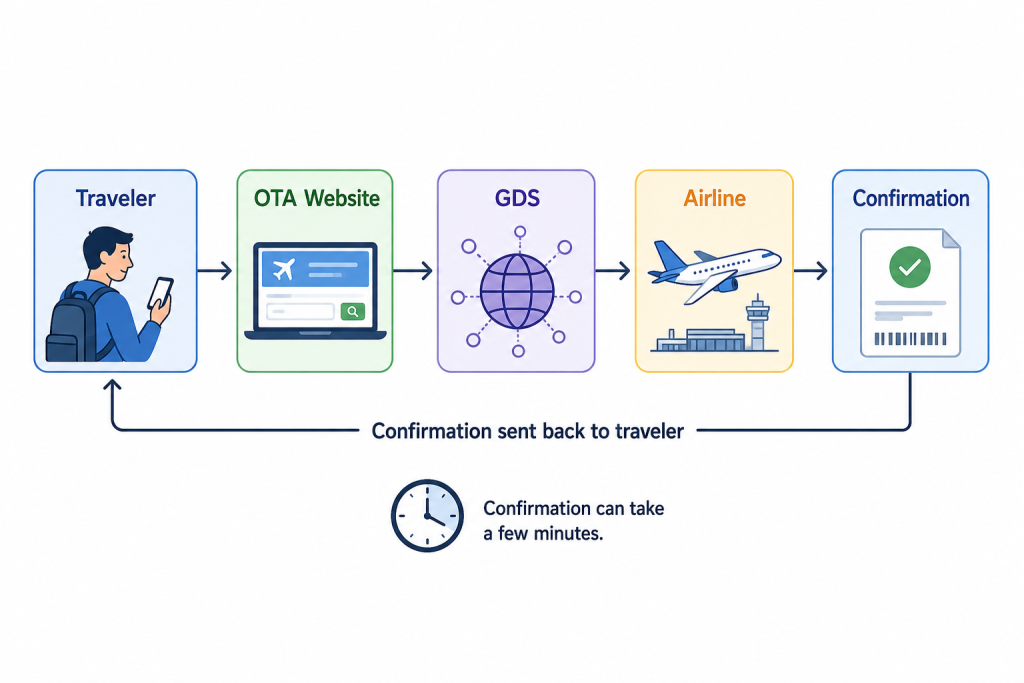
An OTA doesn’t own any airplanes or seats. It connects you to airlines behind the scenes, then sells you a ticket on their behalf.
The Booking Process, Step by Step
Here’s what actually happens when you book a flight through an OTA:
- You search for a flight and pick one.
- The OTA charges your card.
- The OTA then contacts the airline to confirm the seat is still available at that price.
- If everything checks out, the OTA sends you a ticket confirmation.
That last step can take a few minutes. Sometimes it takes longer. Airlines usually confirm your seat right away, since they control their own inventory directly.
What Is a GDS?
Most OTAs get flight prices and seat availability from a system called a Global Distribution System, or GDS. A GDS works like a giant shared marketplace. It connects airlines, hotels, and car rental companies with travel sellers all over the world. You can read more about how a Global Distribution System works on Wikipedia.
OTA vs. Booking Direct vs. Metasearch: What’s the Difference?
These three terms get mixed up a lot. Here’s the simple version.
| What it does | Who completes the sale | |
| Airline (direct) | Sells its own tickets on its own site | The airline |
| OTA | Sells tickets from many airlines on one site | The OTA |
| Metasearch (Google Flights, Kayak, Skyscanner) | Compares prices, then sends you elsewhere to buy | The airline or OTA it sends you to |
A metasearch engine doesn’t sell you anything directly. It compares prices, then redirects you to book somewhere else. An OTA actually completes the sale itself.
How Do OTAs Make Money?
OTAs earn a commission from the airline for each ticket they sell. Some also add a small booking or service fee to your total.
Airfare is a very competitive business. Some OTAs sell flights with almost no profit at all. They’re hoping you’ll add a hotel, a rental car, or travel insurance to your order. Those add-ons usually make more money for the OTA than the flight ticket itself.
Pros of Booking a Flight Through an OTA
- Compare many airlines at once. No need to check ten different airline websites one by one.
- Bundle deals. Booking a flight and a hotel together can sometimes save money.
- Everything in one place. Your confirmation, receipt, and support all live in one account.
- Occasional lower prices. Promotions and member deals can beat the airline’s own listed price.
Cons of Booking a Flight Through an OTA
- Slower support during problems. If your flight is delayed or canceled, you may need to go through the OTA instead of the airline, which can mean longer wait times.
- Confusing refund rules. Fees and policies vary by OTA, and some charges aren’t refundable.
- Delayed confirmation. Your ticket isn’t guaranteed the instant you pay.
- Fewer perks. Seat upgrades, loyalty points, or fee waivers can be harder to get through a third party.
Is It Safe to Book Flights Through an OTA?
Yes, in most cases. Well-known OTAs use secure payment systems and have been operating for years. The bigger risk usually isn’t safety — it’s convenience if something goes wrong with your trip.
Tips for Choosing a Trustworthy OTA
- Stick to well-known names you already recognize.
- Read recent customer reviews before you book.
- Check the cancellation and refund policy before you pay, not after.
- Compare the OTA’s price with the airline’s own website. They should be close.
- Save your confirmation number and look your booking up on the airline’s own site too.
One rule helps here as well. Any OTA or airline that shows you a flight price is required to display the full price, including mandatory taxes and fees, not just a bare base fare. You can read more on the U.S. Department of Transportation’s ticket-buying guide.
The 24-Hour Cancellation Rule and OTAs
In the United States, airlines must let you cancel a brand-new reservation for a full refund within 24 hours of booking, as long as your flight is at least seven days away. This rule comes from the U.S. Department of Transportation.
This rule applies to tickets bought straight from the airline. Many OTAs choose to offer a similar 24-hour window, but they aren’t always required to. Always check the OTA’s own cancellation policy before you pay, especially if your plans could still change.
What to Do If Your Flight Is Delayed or Canceled
If you booked through an OTA and your flight gets disrupted, contact the OTA first. It is usually the “merchant of record,” meaning it processed your payment and is responsible for handling your refund or rebooking request.
Keep these steps in mind:
- Check your OTA account for updates before you call anyone.
- Have your confirmation number ready.
- Ask what the airline is offering, since the airline’s own policy still applies to your seat.
- If the OTA is slow to respond, contact the airline directly too. Airlines can sometimes help even when you didn’t book with them, especially for cancellations.
When Should You Use an OTA Instead of Booking Direct?
Use an OTA when you want to compare many airlines quickly, bundle your trip, or grab a package deal. Book directly with the airline when your travel dates might change, when you want faster support, or when you’re using frequent flyer miles.
Frequently Asked Questions
Is an OTA the same as a travel agent?
Not exactly. A traditional travel agent is a person who plans your trip for you. An OTA is a website where you do the searching and booking yourself.
Do airlines allow OTAs to sell their tickets?
Yes. Airlines work with OTAs on purpose. It’s another sales channel that reaches travelers who might not visit the airline’s own site directly.
Can I check in online if I booked through an OTA?
Yes. Once your ticket is confirmed, you check in with the airline directly, using your confirmation number or record locator.
What does “merchant of record” mean?
It means whichever company processed your payment — the OTA or the airline — is the one responsible for issuing your refund if you’re owed one.

A road trip from Houston to Denver is a classic American adventure, spanning over 1,000 miles of diverse landscapes and charming towns. But how long does it really take to drive from the bustling city of Houston, Texas to the picturesque capital of Colorado? In this article, we will explore the various factors that can affect the duration of your road trip, including the route taken, traffic conditions, and recommended stops along the way.
What is the best route from Houston to Denver?
There are several routes you can take from Houston to Denver, each offering its own unique sights and experiences. The most direct route is via I-45 N and I-40 W, which will take you through Texas, Oklahoma, and into Colorado. This route is approximately 1,140 miles long and can be completed in around 17-18 hours of driving time, without factoring in rest stops or traffic delays.
Alternatively, you can take a more scenic route through the Rocky Mountains via I-10 W and I-25 N. This route will take you through New Mexico and up into Colorado, offering stunning views of the rugged landscape along the way. However, this route is longer at around 1,270 miles and will take about 20-21 hours of driving time.
How long does it really take to drive from Houston to Denver?
The actual driving time from Houston to Denver can vary based on several factors, including the route taken, traffic conditions, and your driving speed. On average, it will take around 17-21 hours to drive the 1,140-1,270 mile distance between these two cities. It’s important to factor in rest stops, meal breaks, and potential traffic delays when planning your road trip.
If you prefer to break up the drive into multiple days, there are plenty of charming towns and attractions to explore along the way. Consider stopping in cities like Amarillo, Texas or Santa Fe, New Mexico to break up the journey and experience the unique culture of each destination.
What are some recommended stops along the way?
As you make your way from Houston to Denver, there are several recommended stops that can enhance your road trip experience. In Texas, consider visiting the Space Center Houston or the San Jacinto Monument for a dose of history and culture. In Oklahoma, stop by the Oklahoma City National Memorial or the Bricktown Entertainment District for some local flavor.
As you enter New Mexico, take some time to explore the art galleries and adobe architecture of Santa Fe, or indulge in some authentic Southwestern cuisine. Finally, as you reach Colorado, make a stop in the quaint town of Boulder for outdoor adventures and vibrant nightlife before reaching your final destination in Denver.
Can I drive from Houston to Denver in one day?
While it is technically possible to drive from Houston to Denver in one day, it is not recommended due to the long hours of driving and potential fatigue. The journey can take anywhere from 17-21 hours without factoring in breaks, meals, or traffic delays. It is safer and more enjoyable to break up the drive into multiple days and take the time to explore the unique destinations along the way.
Is the road trip from Houston to Denver scenic?
Yes, the road trip from Houston to Denver is incredibly scenic, offering a diverse landscape of rolling plains, rugged mountains, and charming towns. The route through the Rocky Mountains in Colorado is particularly breathtaking, with towering peaks and lush forests stretching as far as the eye can see. Be sure to have your camera ready to capture the stunning views along the way!
Conclusion
A road trip from Houston to Denver is a memorable journey that offers a mix of urban excitement and natural beauty. By choosing the best route, planning your stops, and allowing for enough time to enjoy the sights along the way, you can make the most of this classic American adventure. Whether you prefer to drive straight through or take your time exploring the charming towns along the way, the road trip from Houston to Denver is sure to be a trip to remember.
FAQs
Is there a lot of traffic on the route from Houston to Denver?
The traffic on the route from Houston to Denver can vary depending on the time of day and any ongoing construction or accidents. It’s advisable to check traffic conditions before you start your journey and plan accordingly to avoid any delays.
Are there any toll roads on the route from Houston to Denver?
There are several toll roads along the route from Houston to Denver, particularly in Texas and Colorado. Be sure to carry cash or have a toll pass handy to pay for any tolls you may encounter along the way.
What is the best time of year to take a road trip from Houston to Denver?
The best time of year to take a road trip from Houston to Denver is during the spring or fall when the weather is mild and the scenery is at its most colorful. Summer can be quite hot in Texas and Colorado, while winter may bring snow and icy conditions to the Rocky Mountains.
Are there any pet-friendly hotels along the route from Houston to Denver?
Yes, there are plenty of pet-friendly hotels along the route from Houston to Denver, particularly in major cities and tourist destinations. Be sure to call ahead and confirm their pet policies and any additional fees before booking your stay.
What are some must-see attractions in Denver?
Some must-see attractions in Denver include the Denver Art Museum, Red Rocks Park and Amphitheatre, and the historic Larimer Square. Be sure to also explore the trendy neighborhoods of LoDo and RiNo for unique shops, galleries, and dining experiences.

The iconic colorful houses of Bergen, Norway
Woo! I am so excited to cross off another country. If you’ve been following my travels, you already know I’m Scandinavia’s biggest fan.
Our plan for the next few days? An epic road trip starting in the beautiful coastal city of Bergen and driving all the way across the mountains and fjords to Oslo. We packed our hiking boots, picked up our rental car, and hit the incredibly clean Norwegian roads. Here is a look at exactly what we did, what we ate, and a few things you definitely need to know if you’re planning your own trip.
Kicking Things Off in Bergen
Our first stop was Bergen, and honestly, it completely won me over. We skipped the hotels and booked a super cute, quiet Airbnb in a local neighborhood. I always prefer this because you get away from the super touristy areas and actually see where people live.
The streets here are adorable, and the whole city smells like fresh woods and pine trees. It gave me major nostalgia, reminding me of camping trips to Yosemite as a kid.
Sticker Shock and Seafood
We headed out to find some coffee and food. We stumbled into a local spot and grabbed some bao buns and a couple of Americanos. The food was great, but the conversion rate definitely hurt a little—that quick meal cost us $75! Norway is not cheap, folks.
Later, we wandered through the famous seafood market. It is wild! We saw cuts of fresh salmon, caviar, sea urchin, whale burgers, and literally the biggest crab I have ever seen in my life. We weren’t quite ready for a whale burger right then, but it’s a crazy experience just walking through and seeing the local catch.
The Funicular and a Freezing Sauna
You can’t visit Bergen without getting a view from the top. We took the Fløibanen funicular (which I have been mispronouncing for the last 28 years) up the mountain. It’s such a fast, efficient way to get some altitude, and the views over the city are stunning.
Next up, we booked a session at a waterfront sauna. In true fashion, neither of us packed swimsuits, so we went in wearing our sports bras and underwear. The plunge pool water was just above freezing. Getting into cold water is basically my worst nightmare, but after the initial shock, you really do feel invincible. When we got back to the Airbnb, we had that perfect, sleepy “summer camp” feeling where you’re totally exhausted in the best possible way.
Hitting the Road: Waterfalls and Fjord Views
The next morning, we woke up to a very rainy Bergen, packed up the car, and hit the road toward Eidfjord.
Even with gray skies and rain, the drive was completely otherworldly. The air is so fresh, and you just casually pass massive, stunning waterfalls right off the highway. We stopped in Voss for coffee before making our way to our hotel in Eidfjord.
The Incredible Vøringsfossen
One of the absolute highlights of the entire trip was Vøringsfossen. I didn’t come in with huge expectations, but this place is grandiose.
What makes it so special isn’t just the massive waterfall—it’s the architecture. They built these incredible cantilevered observation decks and bridges that blend perfectly into the natural landscape. You get to walk right over the canyon. It’s an architectural marvel, and honestly, it’s an activity that is somehow even better when it’s raining and moody.
Flåm, Food Trucks, and the Longest Tunnel in the World
After leaving Eidfjord, we continued our drive. The weather here is incredibly fickle—it will rain sideways, stop two minutes later, and then the sun comes out.
We eventually pulled into Flåm. We were pretty hungry, and to avoid dropping another $40 per person on a sit-down meal, we found a Mexican food truck. Now, I know what you’re thinking: Mexican food in Norway? But I firmly believe Mexican cuisine has the highest baseline of any food in the world, and it completely hit the spot.
The Stegastein Lookout
After lunch, we drove up to the Stegastein lookout.
If you want a panoramic view of the fjords, this is the place to go. The wooden structure extends 30 meters out from the mountain, dropping straight down into the Aurlandsfjord. It’s absolutely breathtaking and completely worth the drive up the winding mountain roads.
Driving the Lærdal Tunnel
Next, we tackled the Lærdal Tunnel. At 24.5 kilometers (about 15 miles) long, it is the longest road tunnel in the entire world.
Driving through a tunnel for that long can get really monotonous, so the engineers did something genius. Every 6 kilometers, there are these massive cavernous “bubbles” lit up with bright neon blue and yellow lights. It’s meant to prevent driver fatigue by giving your eyes a break, and it feels like you’re driving through a spaceship.
The Final Stretch to Oslo: Glaciers and Snow
We spent a quiet night in Lærdal (a charming town with mossy roofs and a salmon museum), and then started our final push to Oslo.
The landscape changed completely. Suddenly, we were driving right through the middle of snowfields and glaciers. It looked completely frozen over, a massive contrast to the green fjords we had just left behind. We even found an abandoned, dilapidated house on the side of the road with full-grown evergreen trees sprouting straight out of the roof.
We survived the long drive fueled by Gifflar—the absolute best cinnamon roll snacks you can buy at any Norwegian grocery store. By the time we finally rolled into our hip neighborhood in Oslo, we were exhausted but completely blown away by the country.
Practical Tips: Things to Know Before You Go
If you are planning to road trip through Norway, here are a few things I learned the hard way so you don’t have to:
- Prepare for Sticker Shock: Norway is incredibly expensive. A basic lunch for two can easily cost $75 USD. If you want to save money, skip the sit-down restaurants for a few meals and hit up local food trucks or bakeries.
- Track Your Budget: Because costs add up so quickly, I highly recommend using a budgeting app on your trip. It helps you separate fixed costs (like your rental car and Airbnb) from flexible spending (like souvenirs or that $10 coffee).
- Pack Swimwear: Trust me on this one. Public saunas are everywhere, especially along the fjords and waterfronts. Keep a swimsuit in your daypack so you don’t have to jump in wearing your underwear!
- Embrace the Fickle Weather: The weather in the fjordlands changes every five minutes. Bring layers, a solid rain jacket, and don’t cancel your plans just because it’s drizzling. Places like Vøringsfossen are actually cooler in the rain.
- Buy the Grocery Store Snacks: Whenever you stop for gas or a bathroom break, grab a bag of Gifflar (mini cinnamon rolls). They are the ultimate road trip fuel.
What Is an OTA in Flight Booking? A Simple Guide

Houston to Denver Road Trip: How Long Does it Really Take?
The Ultimate Norway Road Trip: Bergen to Oslo (Fjords, Saunas & Waterfalls)
The Ultimate 2026 Guide to Edinburgh Zoo: Tickets, Animals, and Insider Hacks
The Ultimate 2026 Guide to AIC Certified Gluten-Free Pizza in Rome
What Is an OTA in Flight Booking? A Simple Guide
When you shop for flights online, you’ll often see the term “OTA.” This guide explains what it means, how...

Houston to Denver Road Trip: How Long Does it Really Take?
A road trip from Houston to Denver is a classic American adventure, spanning over 1,000 miles of diverse landscapes and...
The Ultimate Norway Road Trip: Bergen to Oslo (Fjords, Saunas & Waterfalls)
The iconic colorful houses of Bergen, Norway Woo! I am so excited to cross off another country. If you’ve been...
The Ultimate 2026 Guide to Edinburgh Zoo: Tickets, Animals, and Insider Hacks
Hey there, fellow wanderers! If you’re plotting a Scottish adventure in 2026, let me tell you right now: Edinburgh Zoo...
The Ultimate 2026 Guide to AIC Certified Gluten-Free Pizza in Rome
Welcome to BlueFire Travel! If you’re navigating the globe with celiac disease or a gluten intolerance, the idea of visiting...
The Ultimate 2026 Guide to Bagni San Filippo: White Whale Parking & Wild Tuscan Hot Springs
Picture this: You’re wandering through a lush, green Tuscan forest when suddenly, a massive, snow-white limestone cliff appears out of...
How to Validate a Contactless Bus Ticket in Rome (Ultimate 2026 Guide)
Ah, Rome. The Eternal City. A place where you can eat your weight in carbonara, marvel at two-thousand-year-old architecture, and…...
Can You Take Large Suitcases on Venice Vaporettos? The Ultimate 2026 Guide
If you are planning a trip to the magnificent floating city of Venice, you are likely dreaming of gondolas, Aperol...
Is it Safe? 7 Best European Cities for Solo Female Travelers in 2026
Traveling solo as a woman is one of the most empowering experiences you can have. But as we step into...


Investigation reveals reasons behind Tybee Island’s brown water
Description: This article delves into the investigation that reveals the reasons behind Tybee Island’s brown water. From the sources of...

 Things To Do2 years ago
Exploring the History and Architecture of the Stairs in St Paul’s Cathedral

 Beaches7 years ago
The Pillars of A Wonderful Historical past – Madurai’s Thirumalai Naicker Mahal
- Travel FAQs3 years ago
Understanding Tax Recovery Charges and Fees: What You Need to Know
- Travel FAQs3 years ago
Decoding La Scala: The Unspoken Dress Code of Milan’s Most Prestigious Opera House
- Beaches3 years ago
Miami vs. Miami Beach: Understanding the Key Differences
- Things To Do3 years ago
Explore the Hidden Gems of Menominee, MI: A Local’s Guide to the Best Activities
- Travel FAQs3 years ago
Escape to the Red Rocks: A Scenic Road Trip from Los Angeles to Sedona
- Beaches3 years ago
Exploring the Proximity: How Far is Calabash, NC from the Beach?


